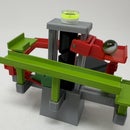
Introduction: Marblevator, Simple, Halloween
"Marblevator, Simple, Halloween" is simply "Marblevator, Simple" in Halloween attire. With the addition of a pumpkin wheel cover and two flickering led candles, this Marblevator is Halloween table ready!
As usual, I probably forgot a file or two or who knows what else, so if you have any questions, please do not hesitate to ask as I do make plenty of mistakes.
Designed using Autodesk Fusion 360, sliced using Ultimaker Cura 5.4.0, and 3D printed in PLA on Ultimaker S5s.
Supplies
Soldering iron and solder.
AWG 28 stranded wire.
Step 1: Parts.
I acquired the following parts:
- One N20 6VDC 30RPM gear motor.
- One twin AAA cell battery pack with wires and switch.
- Two AAA batteries.
- Five 14mm plastic marbles.
- Two 6mm diameter 3mm thick neodymium disk magnets.
- Two "Vont" 38mm diameter tea lights.
I 3D printed the following parts using Ultimaker Cura 5.4.0 Engineering Profile at .1mm layer height, 15% infill:
- Two "Adapter, Candle.stl".
- One "Base Halloween.stl".
- One "Pumpkin.3mf".
- One "Wheel 6 Pumpkin.stl".
I've also included the file "Pumpkin Black.stl" containing the pumpkin eyes, nose and mouth as well as the file "Pumpkin Orange.stl" that contains the pumpkin body, for single extrusion 3D printers.
Depending on your slicer, printer, printer settings and the colors you chose, trimming, filing, drilling and/or sanding may be required. I carefully filed all edges that contacted the build plate to make absolutely certain that all build plate "ooze" is removed and that all edges are smooth using small jewelers files and plenty of patience.
Step 2: Assembly.
To assemble the model, I performed the following steps:
- Removed the flame and led from the two tea lights.
- Soldered a 100mm length of wire wire to the anode of each led and a 90mm length of wire to the cathode of each led.
- Pressed one flame into each of the two "Adapter, Candle.stl".
- Pressed one led into each of the two adapter assemblies.
- Slid one pair of adapter assembly led wires down through the led tower in "Base.stl", pressed the adapter assembly into the top of the led tower, then repeated the same process for the remaining adapter assembly.
- Slid the battery pack wires through the hole in the rear of the base assembly and through the base motor mount cavity, then soldered the wires to the gear motor such that the gear motor shaft rotated clockwise when viewed from the motor shaft end of the gear motor with power applied.
- Soldered the long (anode) led wires to the red battery pack wire on the motor.
- Soldered the short (cathode) led wires to the black battery pack wire on the motor.
- Pressed the gear motor into the motor mount cavity.
- Pressed one neodymium magnet into the magnet pocket in "Wheel 6 Pumpkin.stl" then pressed the wheel assembly onto the gear motor shaft.
- Aligned the wheel with the track.
- Pressed the remaining neodymium magnet into the magnet pocket in "Pumpkin.3mf" matching the polarity of the wheel magnet.
- Magnetically attached the pumpkin assembly to the wheel assembly.
With assembly complete, I turned off the battery pack switch, installed the batteries, turned on the battery pack switch, positioned the marbles on the track, and off it went!
And that is how I 3D printed and assembled "Marblevator, Simple, Halloween".
I hope you enjoyed it and have a safe and happy Halloween!

Participated in the
Halloween Contest


