

Introduction: A Led Sign on the Theme of the Cartoon "La Linea"


I wanted to make a sign with one of these "Neon Led" ribbon.
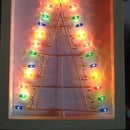
I chose a childhood memory theme: The cartoon "La Linea" (yes I was born in the early '70s).
I wanted the support to be as invisible as possible, as the sign would be stuck on my home office wall.
I didn't take enough photos to make a real Instructable but this build might be some interest to makers, so I'm sharing it anyway.
Supplies
- I chose this ribbon, because it's very flexible and quite cheap. It comes with an IR remote, an app and is compatible with Alexa (which I'm not using).
- The led ribbon is glues on its support with super-glue.
- The sign is glued on the wall with glue pellets.
- You'll aso need a 3D printer to print the support. The .dxf file is available here.
Step 1: The Support
I first chose an image from a cartoon, which is a very famous pose of La Linea, by the way.
I then vectorized this image with Inkskape and saved it in .dxf
I imported this .dxf in a Fusion 360 sketch and resized it to fit my office wall (about 50cm x 55 cm)
I first tried to laser-cut the support as a 2.5mm wide x 5mm thick plywood but it was way to flexible (and quite thick too).
So I 3D-printed it as a 5mm wide x 1.5mm thick ribbon.
My 3D printer is only 210x210mm wide so I had to cut the support into 7 210x210mm tiles and print each tile independantly.
I then glued the pieces togegher with super-glue.
Step 2: Sticking the Led Ribbon


The ribbon was glued with super-glue on the support, piece by piece in order to let it cure well between pieces, especially around bends.
For sharp bends, I've cut flat 3the bottom of the silicon ribbon at the bend so that it does not protrudes on the support.
I sometimes glued the ribbon together on sharp bends such as at the nose and pointy finger (and let it cure before going further).
When I cut the sign from the paper support, it proved way to flexible to be transferred on the wall without deformation, so I stuck several rigid temporary spacers inside the body, head and arm (Sorry, no photo).
I then put a few glue pellets on the led ribbon in order for the sign to stick on a temporary cardboard plate (a calendar) used as a transfer medium.
I then reversed the sign and put glue pellets all along the support (the face that will be against the wall).
I cut each pellet in two with a cutter, since they were too big, and covered the support with half-pellets.
Step 3: Tranfer on the Wall
I used a bubble-level to fix a temporary horizontal guide at the base of the sign, then transfered the sign using the calendar support.
A gentle pry on the calendar unstuck it from the ribbon.
The only thing left was to remove the remporary rigit spacers and enjoy the show!


