

Introduction: How to Use the Integrated ESP8266 + SSD1306 Oled Display in MicroPython


I struggled a bit when using MicroPython with a nice ESP8266 module with integrated SSD-1306 bi-color OLED Display, so I thought the following info could be useful to others.
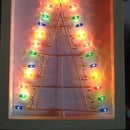
I made a demo which showcases using this OLED Display in MicroPython to display basic text and also graphics, via the MicroPython port of the Adafruit GFX Library.
Supplies
You'll need this module from AliexPress, or any other ESP8266 with a SSD-1306-based OLED display.
You may use any Python IDE, I used uPycraft IDE and this tutorial, since it makes it very easy to flash the MicroPython firmware on the ESP8266 (I then switched to Thonny, which I prefer).
Step 1: Display Specs
This display is I2C and is connected to GPIO12 (SCL) and GPIO14 (SDA).
The thing to know is that the initialization should not use the Pin() function as usual but use the raw GPIO numbers.
The ssd1306 library is built-into the MicroPython firmware.
However, the GFX library is not, and the gfx.py file should be downloaded from here and copied to the ESP8266 (via the Python IDE).
Step 2: Demo Program
The demo program is documented and should be self-explanatory.
It should be copied to the ESP8266 from the Python IDE and will be executed on reboot.
It displays two lines of colored text, a line drawn pixel by pixel, and a few graphic shapes using the GFX library.
It's attached to this page, but here it is for direct view too:
import os, machine
from machine import Pin, SoftI2C
import ssd1306
import gfx
import time

#note: interesting lib for gfx: https://randomnerdtutorials.com/micropython-ssd1306-oled-scroll-shapes-esp32-esp8266/

# ESP8266 Oled Module Pin assignment
i2c = SoftI2C(scl=12, sda=14)

oled_width = 128
oled_height = 64
oled = ssd1306.SSD1306_I2C(oled_width, oled_height, i2c)

oled.text('Hello, World 1!', 0, 1,1) #yellow
oled.text('Hello, World 2!', 0, 17,2) #blue
oled.show()

#draw a line pixel by pixel
for x in range(oled_width + 1):
 oled.pixel(x, 29, 2)


#now use the GFX library to draw various shaped
graphics = gfx.GFX(oled_width, oled_height, oled.pixel)
graphics.rect(5, 35, 20, 20, 2) #x , y, width, height, color
graphics.fill_triangle(30,54,50,54,40,35,2) #vertex coords, color
graphics.circle(65, 45, 10, 1) #x, y center, radius, color
graphics.line(80,54,100,34,1) #x, y start and end

oled.show()
time.sleep(2)

#scroll down whole screen
for y in range(oled_height):
  oled.scroll(0,1) #dx, dy
  oled.show()

oled.text('Please reboot',0,1,1)
oled.text('to restart demo.',0,17,2)
oled.show()


