

Introduction: Steps to Setup Arduino IDE for NODEMCU ESP8266


In the below Instructable we will learn how to install Arduino IDE for ESP8266 so by the end of this Instructable we can run arduino code on ESP8266
Step 1: Installing Arduino IDE Software
Install Arduino IDE software from the link http://www.arduino.cc/en/main/software
Step 2: Arduino IDE Icon

After installing Arduino IDE icon is created on the Desktop as show in the figure
Step 3: Opening Arduino IDE
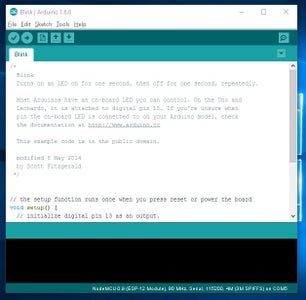
Click on the Icon to open the Arduino window as shown in the figure
Step 4: Preferences
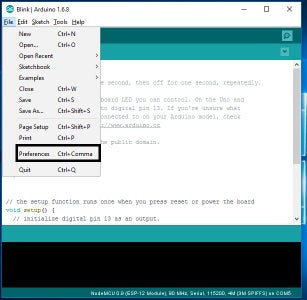
Open the File and click on the Preferences as shown in the figure
Step 5: Adding ESP8266 Board Manager

In the Additional Boards Manager enter below URL.
http://arduino.esp8266.com/stable/package_esp8266com_index.json
As highlighted in the figure and enter OK.
Step 6: Selecting Board

Now open the tools in that select Board: “Arduino/Genuino Uno” and click on the Boards Manager as shown in the figure
Step 7: ESP8266 Board Package

The Boards Manager window opens, scroll the window page to bottom till you see the module with the name ESP8266. Once we get it, select that module and select version and click on the Install button. When it is installed it shows Installed in the module as shown in the figure and then close the window.
Step 8: Selecting ESP8266 Arduino Board
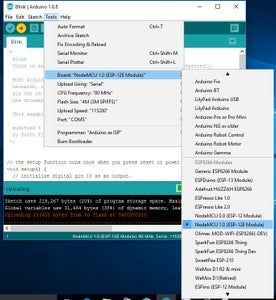
To run the esp8266 with Arduino we have to select the Board: “Arduino/Genuino Uno” and then change it to NodeMCU 1.0 (ESP-12E Module) or other esp8266 modules depending on what you have .This can be done by scrolling down, as shown in the figure
Step 9: Connecting ESP8266 to the PC


Now Let’s connect the ESP8266 module to your computer through USB cable as shown in the figure. When module is connected to the USB, COM port is detected eg: here COM5 is shown in the figure.
Step 10: Selecting Example Program in Arduino IDE

Now open the File tab in that go to the Examples in that enter into Built-in example, go to 01.Basics and click on Blink to open the window
Step 11: Selecting COM Port

The Blink example will open on a new window , click on tools to select the port: “COM” based on which esp8266 module is connected to your respected COM port of the computer. To select COM port refer previous steps.
Step 12: Uploading the Program to ESP8266 Module

On the blink example code change all number 13 to number 16 and then click on the right arrow shown in the figure to upload the program to the module. This will start blinking the on board led on the nodemcu module
void setup()
{
// initialize digital pin 16 as an output.
pinMode(16, OUTPUT);
}
// the loop function runs over and over again forever
void loop()
{
delay(10);
digitalWrite(16, HIGH); // turn the LED on (HIGH is the voltage level)
delay(1000); // wait for a second
digitalWrite(16, LOW); // turn the LED off by making the voltage LOW
delay(1000); // wait for a second
}
Step 13: Adding Libraries

In case you need to add the libraries to the Arduino follow the example path is shown in the figure i.e C:\Users\Armtronix\Documents\Arduino\libraries. Enter into the libraries folder then paste the file in that as shown below.

![Tim's Mechanical Spider Leg [LU9685-20CU]](https://content.instructables.com/FFB/5R4I/LVKZ6G6R/FFB5R4ILVKZ6G6R.png?auto=webp&crop=1.2%3A1&frame=1&width=306)


